You can use the workflow and conversation tools to add notes or information to your presentation or the presentation items; and to send those notes to other users. This helps you to collaborate with other users when building or refining your presentations.
There are two types of workflow available to you:
- Built-in conversations: Where you use a chat-style conversation tool to create a threaded commentary with other users.
- Custom workflow: Where you use a custom multi-step workflow (designed by a developer) to communicate based on needs arising from your normal working practices. For example, you may use this functionality to communicate during a standardized presentation review cycle.
Workflows or conversations?
Workflows let you annotate data points, hierarchy members, and discoveries, presentations, and so on. You can attach content to workflows as a payload. Note: Developers can use the Workflow API to build their own mini workflow apps.
Conversations are a specific workflow type, that let you to write comments in conversation threads with other users. The conversation framework is included in the application out-of-the-box.
The following video demonstrates Workflows:
- Click here for an in-depth review of Workflows and Conversations in Discover
Conversations
Create a New Conversation
With the presentation open at runtime, open the New Conversation dialog using one of the following options:
- From the right-click context menu:
- Select a member or cell and right-click Extended Operations > Start New Conversation.
- Click anywhere on the slide background and right-click Start New Conversation.
- From the Panel Tools associated with any visual, click Workflow, then click Start New Conversation.
- Open the Present runtime menu, toggle the Workflow for Dashboard option on, then click Start New Conversation.
New Conversation dialog
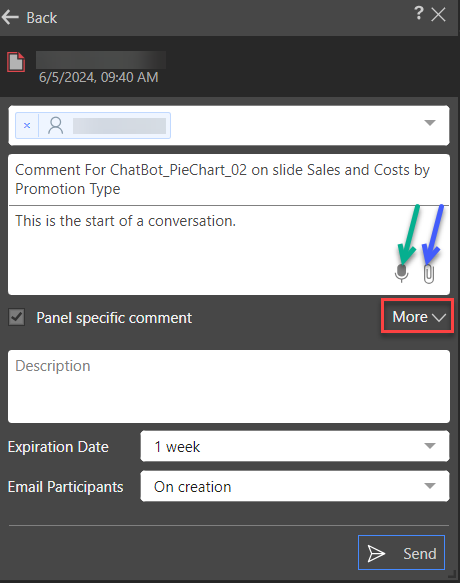
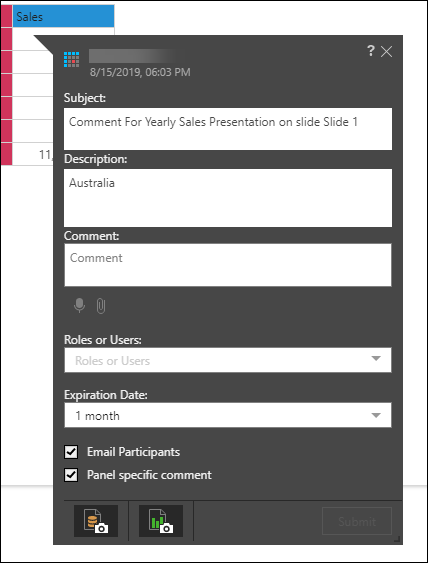
Basic details
- To - Add Roles or Users to the conversation. When a role is added, it is counted as one participant in the conversation, regardless of the number of users who share that role.
- Description (optional) - The background of the conversation. By default, this is populated with the details of the item that the conversation is attached to.
- Comment. - The message that is used to launch the conversation. When others in a conversation thread respond, they are usually reacting to this text. You can also attach an audio recording or document to the comment.
- Panel specific comment - Indicate whether the conversation or workflow is linked to the specified member or cell in the given discovery in the given presentation only (panel specific), or whether it is global (relevant across the data model). This option is only enabled once the presentation has been saved
Note: Not all roles can be selected as recipients. Administrators can hide roles from the Content Settings page in the Admin Console.
Note: You can add additional users to the conversation by including their username in the comment using the @ prefix (@UserName).
Advanced details
Note: Access these options by clicking More.
- Description (optional) - More optional text.
- Expiration date - After this date you will no longer be able to access this conversation. If you do not want the conversation to expire, select None.
- Email participants - Select when to send emails to the recipients. Note: All recipients receive a bulletin board alert to notify them that the new conversation has been created.
- None - Send no emails.
- On Creation - Send an email alert when you add a new recipient to the conversation. Participants will receive an email notifying them that they've been added to a new conversation, along with a link to the conversation.
- On Creation and Every Comment - Send an email alert to participant you've added to the conversation both on creation and for every new comment added. The email will only be sent after 10 seconds if the user has not already accessed the comment in real time. Participants will receive an email notifying them that a new comment has been added, along with a link to the conversation.
Voice Messages and Attachments
You can record a voice message and attach files and images and send them in the conversation thread.
- To record a message, click the microphone icon. To use the recording facility, the Pyramid website must be running with secure communication over HTTPS using a valid SSL certificate for this functionality to be enabled. On first use, each user will also need to explicitly authorize the browser to use the audio recording functionality.
- To attach a file, click the paperclip icon, then select the required file from its folder location.
Workflows
Workflows may created at the panel, member, or cell level:
- Report level: A workflow based on the given presentation slide.
- Member level: A workflow based on a given member in a discovery.
- Cell level: A workflow based on a given cell (data point) in a discovery.
A workflow may be panel-specific or global:
- Panel specific: The workflow is linked to the specified member or cell in the given discovery in the given presentation only. When creating a panel-level item, it is panel-specific by default.
- Global: The workflow is linked to the specified member or cell across the data model. The workflow can be opened from any discovery containing the given member or cell, in both Discover and Present.
Tip: To create a panel-specific item, select the Panel specific comment checkbox. To create a global item, clear this checkbox.
New Workflow
If there are custom workflows, the option Workflows is enabled on the right-click context menu.
To enable custom workflows or conversations in Present, open your presentation at runtime. Right-click a member or cell in a discovery, and from the context menu click Start New Conversation. If there are custom workflows, the choice becomes Workflows, followed by the choice of the custom workflows or conversations.
Alternatively, open the Workflows panel in one of the ways listed above. From the Workflows panel and you can start a new workflow. You can also filter by type to show or hide:
- Global workflows
- Workflows started in Discover
- Workflows started in Present
- Click here for details about filling out the New Conversation dialog from the Discover help.
Because workflows are applied to the given assets, a workflow that was started in Present can also be opened in Discover. For example, a global cell-level conversation started in Present will be accessible everywhere that cell appears (in any discovery containing that cell) in both Discover and Present.
- Click here to learn about managing workflows and conversations from the Discover help
Open an Existing Workflow in Present
To open an existing workflow, launch the presentation at runtime. Open the Present runtime menu and toggle Workflows to on. From the panel, filter by level and type:
- Global
- Discover specific
- Present specific
Click a workflow to open it:
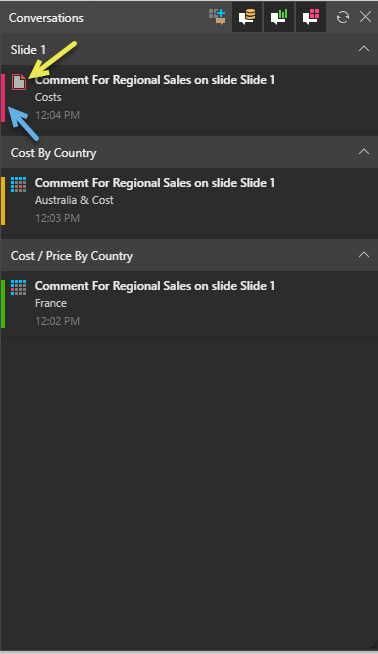
Workflows Panel
The "workflow level" is denoted by the icons used in the list (yellow arrow above):
-
 Report level
 -
 Member level
 -
 Cell level
Workflows in the panel are also color-coded according to type (blue arrow):
- Red indicates a Present-specific workflow.
- Green indicates a Discover-specific workflows.
- Yellow indicates global workflows.
Leave a Workflow
To remove yourself as a participant from a workflow, open the workflow, click the context menu (three ellipses), and click Leave.
Workflows Feed
You can access your workflows from the Workflows Feed.
- Click here to learn more about the Workflows Feed